

Welcome to the ultimate guide to making paper airplanes Whether you’re a novice looking to learn the basics or an experienced enthusiast seeking new designs, this comprehensive guide has got you covered. Get ready to embark on an exciting journey into the world of paper aviation. In this article, we’ll provide step-by-step instructions, tips, and tricks to help you create an amazing paper airplane that soars through the skies.
Table of Contents
1. Introduction
2. Materials Needed
3. Basic Folding Techniques
4. Simple Paper Airplane Designs
5. Intermediate Paper Airplane Designs
6. Advanced Paper Airplane Designs
7. Tips for Achieving Distance and Accuracy
8. Frequently Asked Questions
Introduction:
Paper airplanes have fascinated people of all ages for generations. The joy of folding a simple sheet of paper into a flying machine is truly unmatched. It’s a fun and educational activity that encourages creativity and experimentation. Whether you’re a child or an adult, making paper airplanes is a delightful way to spend your time. So, let’s dive into the world of paper aviation and learn how to make incredible flying creations.
Materials Needed:
To get started, you’ll need a few basic materials. Don’t worry; these items are easy to find and are probably already lying around your house:
- Sheets of paper (standard letter size or A4)
- Scissors (for certain designs)
- Ruler (optional, but helpful for precise measurements)
Now that you have your materials ready, let’s move on to the next section and learn some essential folding techniques.
Basic Folding Techniques:
Before we begin crafting specific paper airplane designs, it’s important to familiarize yourself with a few basic folding techniques. These techniques form the foundation of most paper airplane constructions. Mastering them will enable you to create sturdy and aerodynamic planes. Here’s a step-by-step guide:
1. Valley Fold:
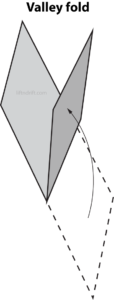
Fold the paper in half from top to bottom, aligning the edges perfectly. Crease the fold with your fingers or a ruler to create a sharp, crisp edge.
2. Mountain Fold:
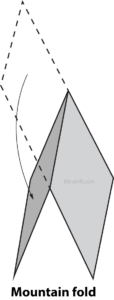
Unfold the paper if you’ve performed a valley fold. Now, fold the paper in half from left to right, again aligning the edges accurately. This time, the folded portion should be on the outside, creating a raised or mountain-like fold.
3. Pleat Fold:
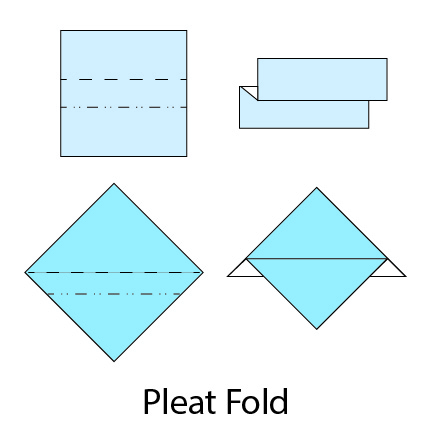
Create multiple valley and mountain folds in alternating directions. This folding technique is useful for adding stability and shape to your paper airplanes.
Remember, practice makes perfect. Spend some time honing your folding skills before attempting more complex designs. Once you’re comfortable with the basic techniques, it’s time to explore different paper airplane designs.
Simple Paper Airplane Designs
Let’s start with some simple yet effective paper airplane designs that are perfect for beginners. These designs are easy to fold and provide a great foundation for understanding the principles of flight. Here are three designs to get you started:
1. Dart:
- Take a sheet of paper and fold it in half lengthwise.
- Fold the top corners diagonally to the center fold creating two triangular flaps.
- Fold the entire model in half along the center fold, with the flaps on the outside.
- Create small wing flaps by folding the angled edges inward.
- Your dart paper airplane is ready to fly.
2. Glider:
- Begin with a sheet of paper and fold it in half lengthwise.
- Unfold the paper and make a small valley fold along the center crease.
- Fold the top edges diagonally to the center fold, creating two triangular flaps.
- Fold the newly formed triangle flaps in half again, this time bringing the folded edges to the outer edges.
- Adjust the wing flaps to achieve desired stability.
- Your glider paper airplane is ready to soar through the air
3. Nakamura Dart:
- Start with a sheet of paper and fold it in half lengthwise.
- Unfold the paper and fold the top edges diagonally to the center fold, creating two triangular flaps.
- Take the top layer of each flap and fold it downward, aligning the bottom edge with the center fold.
- Flip the model over and repeat the previous step.
- Fold the model in half lengthwise.
- Fold the wings down along the existing creases.
- Your Nakamura dart paper airplane is set to take flight
These simple designs should give you a taste of the possibilities. Experiment with different paper sizes, wing shapes, and adjustments to see how they affect flight performance.
Intermediate Paper Airplane Designs:
Once you’ve mastered the basics, it’s time to move on to intermediate paper airplane designs. These designs incorporate more advanced folding techniques and offer improved flight characteristics. Here are three designs to challenge your skills:
1. Boomerang:
- Begin with a sheet of paper and fold it in half diagonally, creating a triangle.
- Unfold the paper and fold the top edges toward the center fold, forming a diamond shape.
- Fold the bottom edge up to meet the top edge, creating a smaller triangle.
- Fold the right side of the triangle inward along the center crease.
- Repeat the previous step with the left side of the triangle.
- Fold the entire model in half along the center crease.
- Your boomerang paper airplane is ready to come back to you
2. Zazoom:
- Start with a sheet of paper and fold it in half lengthwise.
- Unfold the paper and fold the top corners toward the center fold, creating two triangular flaps.
- Fold the bottom edge up to meet the top edge, aligning it with the center crease.
- Fold the entire model in half along the center crease, with the flaps on the outside.
- Fold the wings down along the existing creases to create stability.
- Your Zazoom paper airplane is set for high-speed flights
3. Slick Slider:
- Take a sheet of paper and fold it in half diagonally, creating a triangle.
- Unfold the paper and fold the top corners toward the center point, forming two smaller triangles.
- Fold the top edges of the smaller triangles toward the center fold.
- Fold the entire model in half along the center crease, with the flaps on the outside.
- Create wing flaps by folding the angled edges inward.
- Your slick slider paper airplane is ready to glide smoothly through the air
Keep practicing these designs and experiment with different adjustments to improve their performance. Once you feel confident, it’s time to explore advanced paper airplane designs.
Advanced Paper Airplane Designs:
If you’re up for a challenge, advanced paper airplane designs will push your skills to the limit. These designs require precise folding and attention to detail. Here are three designs that will impress even the most seasoned paper aviators:
1. Valkyrie:
- Begin with a sheet of paper and fold it in half diagonally, creating a triangle.
- Unfold the paper and fold the top corners toward the center point, forming two smaller triangles.
- Fold the bottom edge up to meet the top edge, aligning it with the center crease.
- Fold the model in half along the center crease, with the flaps on the outside.
- Fold the wing flaps inward, aligning them with the center crease.
- Fold the tip of the triangle down to create the nose of the airplane.
- Your Valkyrie paper airplane is ready for epic flights
2. Skorpion:
- Start with a sheet of paper and fold it in half lengthwise.
- Unfold the paper and fold the top corners toward the center fold, creating two triangular flaps.
- Fold the top edge of each flap downward, aligning it with the bottom edge.
- Fold the entire model in half along the center crease, with the flaps on the outside.
- Fold the wing flaps downward along the existing creases to create stability.
- Your Skorpion paper airplane is ready to strike the skies
3. Racer:
- Take a sheet of paper and fold it in half lengthwise.
- Unfold the paper and fold the top corners toward the center fold, creating two triangular flaps.
- Fold the top edge of each flap downward, aligning it with the bottom edge.
- Fold the entire model in half along the center crease, with the flaps on the outside.
- Fold the wing flaps downward along the existing creases to create stability.
- Fold the tip of the triangle down to create the nose of the airplane.
- Your Racer paper airplane is ready for high-speed races
These advanced designs require patience and precision. Take your time, and don’t get discouraged if it takes a few tries to get them right. Remember, practice makes perfect.
Tips for Achieving Distance and Accuracy
To make your paper airplanes fly farther and more accurately, keep the following tips in mind:
1. Paper Selection: Choose lightweight paper for distance flights and heavier paper for stability and accuracy.
2. Smooth Folds: Make clean and precise folds to ensure aerodynamic integrity.
3. Aerodynamic Adjustments: Experiment with wing shapes, wing angles, and tail flaps to optimize flight performance.
4. Launch Technique: Hold your paper airplane by the bottom center and release it with a smooth, level throw.
5. Trimming: If your airplane consistently veers to one side, adjust the wings slightly to counterbalance the flight path.
6. Environment: Fly your paper airplanes in open spaces with minimal wind for better control and longer flights.
By implementing these tips, you’ll be able to maximize the performance of your paper airplanes and achieve impressive distances and accuracy.
Frequently Asked Questions:
To make a paper airplane, follow these simple steps:
– Start with a rectangular sheet of paper.
– Fold the paper in half lengthwise to form a crease.
– Open the paper and fold the top corners inward to the center crease.
– Fold the newly formed triangle down
to create the nose of the airplane.
– Fold the wings down from the top edges to create stability.
– Adjust the wings, tail flaps, and overall shape as desired.
– Your paper airplane is ready to fly
Lightweight paper, such as printer paper or origami paper, is commonly used for paper airplanes. However, you can experiment with different paper weights and textures to achieve varying flight characteristics.
To make a paper airplane perform tricks, you can experiment with various adjustments and techniques. Some tricks include loops, barrel rolls, and flips. Adjust the wing flaps, add weight to specific areas, or launch the airplane at different angles to achieve different tricks.
Absolutely Decorating your paper airplanes can add a personal touch and make them more visually appealing. Use markers, colored pencils, or stickers to customize your designs. Just remember not to make the airplane too heavy with excessive decorations, as it may affect its flight performance.
Congratulations You’ve completed the ultimate guide to making paper airplanes. With the step-by-step instructions, folding techniques, and various designs provided, you’re well-equipped to create amazing paper aircraft. Remember to practice, experiment, and have fun along the way. Happy flying.